Loading a program via a txt file onto the HX-20 requires an appropriate null modem cable. This cable uses the HX-20’s RS232C port to connect to a PC serial port. The original cable that could be used for this role is the Epson #714 cable, which unfortunately is very difficult to find these days, so, it is best to just create your own.
During my research I determined that there are 2 options to choose from when making your own cable.
- A simple null modem cable without handshaking
- A null modem with partial handshaking
The simple null modem cable is the easiest to make since only 3 wires require soldering. However, the downside of this type of cable is that it has no flow control, which, if I understand correctly, means that the sender of the data (PC) will overwhelm the receiver (HX-20). In this situation a error will display on the HX-20.
There are 2 ways to counter this problem 1) Set the transfer rate on both machines to 300bps only. 2) Set the transfer rate to 4800bps on both machines with a inter-character delay of 10ms on the PC.
The null modem with partial handshaking requires soldering 8 wires plus an additional loopback wire, this is far more difficult for someone who lacks soldering experience. However, the benefit of this cable is that your transfers will now have flow control, which will allow the accurate transfer of data to your HX-20 at speeds up to 4800bps. No inter-character delay required.
I personally went with the simple null modem, it was just so much easier. At some point I may like to make the partial handshaking cable, so, I will detail the setups required for making both cables below.
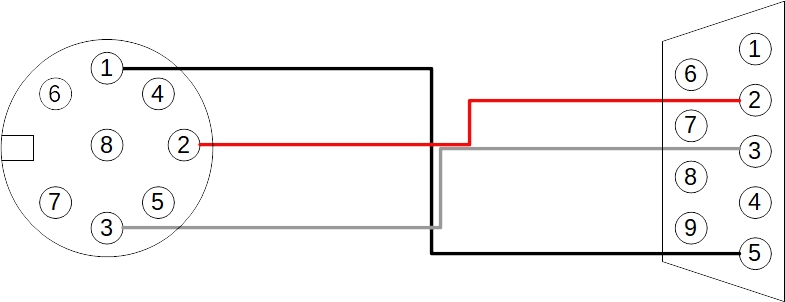
Simple Null Modem
The easiest way to make the Simple Null Modem cable is to buy one, cut one of the ends off, expose the wires, use a multimeter to determine which exposed wires are associated with which pins, then solder the correct 3 wires into a blank 8 or 5 pin DIN connector. In order to do this you will need the following:
- DB9 Null Modem cable with at least one female end
- Soldering station/iron + some solder
- 8 or 5 pin DIN connector
- Multimeter
- Wire cutters and strippers
The Simple Null Modem cable needs to be connected according to the following wiring diagram. Note: The pin labelling in this diagram is of the inside side of the cable (the side you physically solder). If this was a completed cable and you were looking at the end of each connector, as in you were going to plug it into your face, the pin numbers would be reversed, like in a mirror.
Null Modem with Partial Handshaking
Trying to determine which fully featured cable was the correct one to make was a difficult process. There are several HX-20 related websites that show wiring diagrams and they don’t all match. In the end I went off the HX-20 Operations Manual.
The particular Epson cable I used as a guide was #716. This is a DIN to DIN cable for connecting two HX-20s together. However, to connect to a PC I need to convert the pinouts for one end of the cable from a DIN to DB9 (DE9) cable. I used this Wikipedia page for the conversion, the corrected pins are listed in the following DB9 table.
DIN Pins
| Pin | Signal | Colour |
| 1 | GND | Black |
| 2 | TX | Red |
| 3 | RX | White |
| 4 | RTS | Brown |
| 5 | CTS | Brown |
| 6 | DSR | Yellow |
| 7 | DTR | Green |
| 8 | CD | Blue |
DB9 (DE9) Pins
| Pin | Signal | Colour |
| 1 | CD | Brown |
| 2 | RX | Red |
| 3 | TX | White |
| 4 | DTR | Yellow |
| 5 | GND | Black |
| 6 | DSR | Green |
| 7 | RTS | Blue |
| 8 | CTS | Blue |
The Operations Manual indicates which pins from each cable end need to be connected using a colour code (which could be the actual wire colours). You can see the colours in the tables above. This website confirms the above connections. On that site the author mentions that he used a #715 cable, I believe this is a typo and he actually meant a #714 cable (which is the printer cable mentioned in the Operations Manual). Comparing the pins from the #714 cable with the Wikipedia page also confirms the correct DB9 pins. The following diagram is therefore the correct wiring layout.
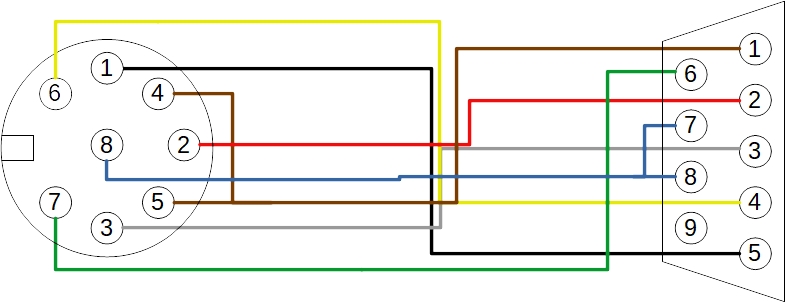
To make this cable you will need the same equipment as listed for the Simple Null Modem cable. The only difference is that a DB9 Null Modem with Partial Handshaking cable would need to be purchased.